Combining Contact Image Sensors
Inspection using line-scan sensors is somewhat a niche market within the machine vision market. Line-scan sensors are used when a very high-resolution image is required to inspect the surface of large, moving, flat objects such as paper, laminates, plastic films, textile, foils, glass, steel or even PCBs. Building inspection systems using line-scan sensors requires a unique know-how as, contrary to area-scan acquisition, a tight coupling of the sensor acquisition rate (i.e., the line rate) and the object’s movement is required.
“Contact Image Sensors (CIS) such as offered by Mitsubishi Electric have clear advantages against more traditional line-scan cameras” says Marc Damhaut. They are placed very close to the object to be inspected and are a perfect solution when there is little space available around the object. They offer a telecentric view of the surface to be inspected, with no distortion and no lighting non-uniformities. Hence, they produce a 1:1 image which is an accurate representation of the surface. In addition, Contact Image Sensors are complete solutions that integrate the sensor, its lighting and optics into a single device that can be offered pre-calibrated.

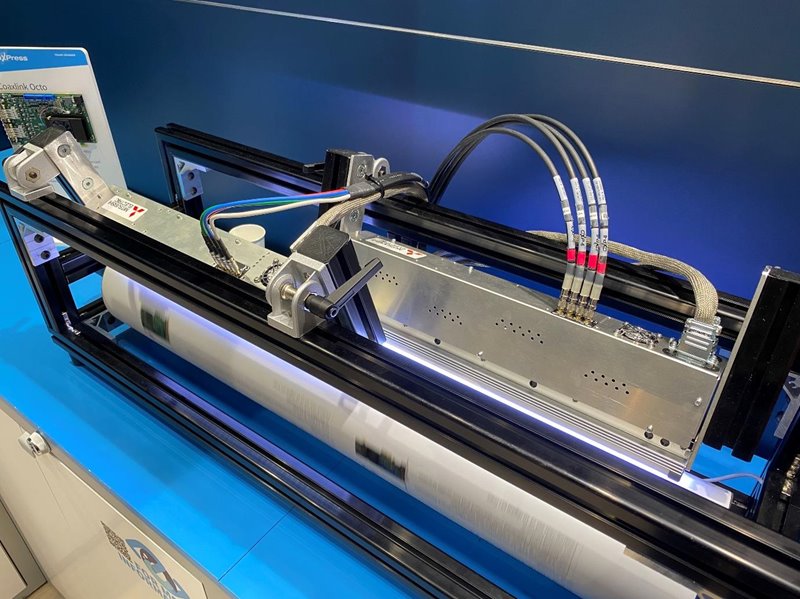
Figure 1 Example of 2 Mitsubishi CIS staggered and synchronized to cover a wider fast moving field of view
This results in a genuine and undistorted image. The foundation of proper image analysis. Euresys has a lot of experience with line-scan applications. Euresys’ Camera Link and CoaXPress frame grabbers offer all the functions required to control line-scan sensors, including Contact Image Sensors. Euresys’ frame grabbers feature general-purpose I/O lines dedicated to interfacing quadrature motion encoders, with various types of electrical interfaces and programmable noise filters. In addition, features such as the Rate Divider and the Rate Converter tools available in Euresys frame grabbers allow the very fine control of the synchronization between the object’s motion and the sensor’s line rate, and thus the pixel aspect ratio.
In recent application cases, Mitsubishi Electric and Euresys have successfully cooperated and shared their know-how to push the limits of the inspection of large object surfaces.
A recent case involves the simultaneous use of two Camera Link Contact Image Sensors, the goal being to inspect wider surfaces. The sensors are installed in a staggered layout, with a chosen and managed overlap to ensure the continuity of the inspection over the whole width of the field of view. Each sensor is connected to two Euresys Grablink Full XR frame grabbers. The four Euresys frame grabbers are able to stitch the images together, while managing the overlap, in order to produce in the host PC memory a single image ready to be inspected. This is done using DMA (Direct Memory Access) without loading the host CPU.
Another constraint overcome by the Grablink Full XR is the distance between the cameras and the host computer. On such large production machines, it is common that the inspection heads be several meters away from the host PC. When this is the case, the ECCO+ (Extended Camera Link Cable Operation) feature of the Grablink Full XR allows the reliable transmission over the required length of cables, well beyond the maximum cable length specified in the Camera Link standard.
An additional benefit of the setup is the capability of the Grablink Full XR to remain synchronously operational over a wide range of speeds through which the process could vary, in this use case, over two orders of magnitude, upon process start, stop and or other unusual process induced throughput variations. Because of its high accuracy and deterministic interfacing with the CIS and user’s process signals through GPIO lines, these variations are easily handled by the Euresys solution.
Efficient image acquisition, in combination with Mitsubishi Electric’s capabilities to interface with the factory automation world, gives our customers the opportunity to optimize easily their processes. Thanks to this seamless integration of multiple cameras outputs, the CIS size is not the limiting factor anymore to the size of the surface being inspected in one pass. This flexibility is also highly appreciated by the solution integrators/machine builders who would want to have the flexibility to adapt their solutions to their customer’s specific requirements. Martin Messy (Director CIS Europe at Mitsubishi Electric): “We really appreciated the very professional and customer-oriented cooperation during joint projects. Outstanding technology and solution-oriented working methods, the basis for successful customer projects and, in the end, satisfied customers.”
Marc Damhaut to conclude: “It is a priority for Euresys to entertain a close collaboration with the market stakeholders (camera makers, machine builders, integrators, users, …) in order to propose state of the art hardware and software matching the specific requirements of the machine vision industry.”
Watch this video with Julien Weber (Euresys) explaining the integration of a Euresys Coaxlink Octo frame grabber with two staggered Mistubishi CIS’es for an optimal and seamless high speed capture of large surfaces: